Best practices for configuring Microsoft 365 and Proofpoint coexistence—transport rules, connectors, phishing simulations, and preventing direct delivery attacks.
| Date | Category |
|---|---|
| 2025-12-17 | Email Security |
TL;DR: When using Proofpoint as your email gateway with M365, you need to: (1) create inbound/outbound connectors, (2) bypass EOP spam filtering for Proofpoint IPs, (3) prevent direct delivery attacks by blocking mail that bypasses Proofpoint, and (4) disable conflicting security features like Safe Links URL rewriting. Most changes happen in the Exchange Admin Center.
📝 Update — January 27, 2026
Note: If you’re experiencing email delays, this optimization may help. However, emails with legitimate attachments can still be delayed up to 4 minutes due to Proofpoint’s attachment scanning and sandboxing process.
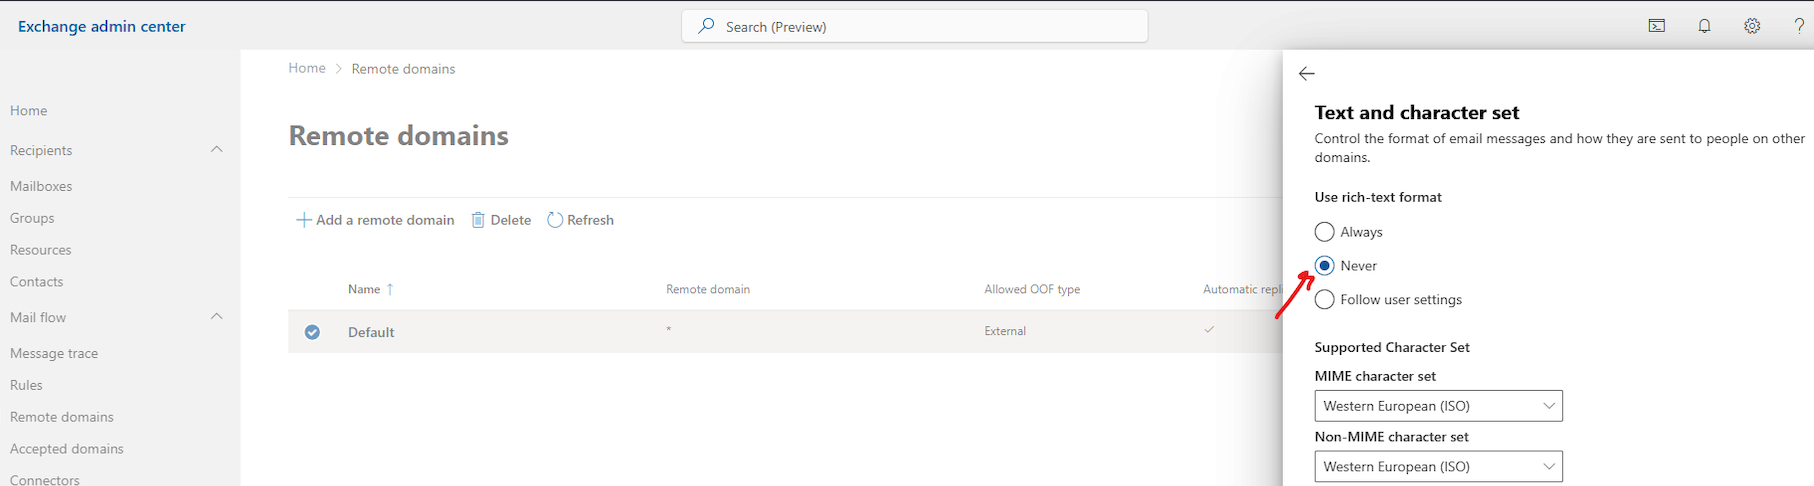
Disable RTF to prevent
winmail.dat: Exchange Online’s Rich Text Format createswinmail.datfiles that cause Proofpoint to treat every email as having an attachment, triggering unnecessary scanning. To disable, go to Exchange Admin Center → Mail flow → Remote domains → Default → Edit → set Use rich-text format to Never.
PowerShell:
Set-RemoteDomain -Identity "Default" -TNEFEnabled $false
Overview
Microsoft 365 provides many email security tools natively. However, organizations that incorporate defense-in-depth for email often use third-party security solutions like Proofpoint Protection Server (PPS). When integrating M365 with Proofpoint, you need to configure:
- Inbound mail flow — Route incoming mail through Proofpoint before it reaches M365
- Outbound mail flow — Route outgoing mail through Proofpoint for filtering
- Security feature coexistence — Disable or configure M365 features that conflict with Proofpoint
⚠️ Change Control: Proofpoint recommends making changes during a well-planned change control window. M365 changes can take up to 30 minutes to propagate—sometimes several hours for all nodes.
Configure Inbound Mail Flow
Before updating your domain’s MX records to point to Proofpoint, complete these steps in M365.
Step 1 — Create Inbound from Proofpoint Connector
This connector enforces TLS for messages received from Proofpoint and identifies it as a trusted partner.
- Log in to the Exchange Admin Center (https://admin.exchange.microsoft.com/)
- Navigate to Mail flow → Connectors
- Click + Add a connector
- Configure:
- Connection from: Partner organization
- Connection to: Microsoft 365 (pre-selected)
- Click Next
- Name the connector:
Inbound from Proofpoint - Description:
Used to enforce TLS for messages received from Proofpoint - ✅ Check Turn it on, then click Next
- Select: By verifying that the IP address of the sending server matches one of the following IP addresses…
- Add all IP addresses of your Proofpoint Protection Server
- Click Next
- ✅ Check Reject email messages if they aren’t sent over TLS
- Click Next, verify settings, then Create connector
⚠️ Warning: If TLS cannot be negotiated, EOP will defer emails (4.x SMTP response). If Microsoft changes this to a 5.x response, emails would be rejected.
Step 2 — Exclude Proofpoint from EOP Spam Module
Messages from Proofpoint should bypass EOP spam filtering since they’ve already been scanned. You have two options:
Option 1: Connection Filter IP Allow List (Recommended)
- Log in to Microsoft 365 Defender (https://security.microsoft.com)
- Navigate to Email & Collaboration → Policies & Rules → Threat policies → Anti-spam
- Click Connection filter policy (default)
- Click Edit connection filter policy
- Under Always allow messages from the following IP addresses, add all Proofpoint IP addresses
- Click Save
Verification: Check email headers for IPV:CAL — this indicates spam filtering was bypassed due to IP Allow List.
Option 2: Transport Rule to Bypass Spam (Alternative)
- In Exchange Admin Center, go to Mail flow → Rules
- Click + Add a rule
- Name:
Bypass Spam Filtering for Proofpoint - Apply this rule if: The sender → IP address in any of these ranges
- Add all Proofpoint IP addresses
- Do the following: Modify the message properties → set the spam confidence level (SCL) → Bypass spam filtering
- (Optional) Add another action: Set message header
BypassFocusedInboxtotrue - Click Save
💡 Tip: Implement both options in production for redundancy.
Step 3 — Enable Enhanced Filtering (OPTIONAL)
Enhanced Filtering allows M365 to see the original sender’s IP address (one hop back from Proofpoint) for additional security checks.
Why it’s optional: When you enable Enhanced Filtering, Microsoft can perform additional filtering based on the original sender’s IP address and reputation. However, if you’re using Proofpoint as your primary email security gateway, you may choose to fully trust Proofpoint’s filtering and skip this step entirely. I personally skipped this step.
Reasons to skip:
- You trust Proofpoint’s security scanning completely
- You want to avoid potential false positives from Microsoft’s additional checks
- Simpler configuration with fewer variables to troubleshoot
Reasons to enable:
- Defense-in-depth approach with multiple layers of filtering
- Leverage Microsoft’s threat intelligence alongside Proofpoint
- Better visibility into original sender reputation in M365 logs
To enable Enhanced Filtering:
- Navigate to Microsoft 365 Defender → Threat policies
- Under Rules, click Enhanced Filtering
- Click on the Inbound from Proofpoint connector
- Select: Skip these IP addresses that are associated with the connector
- Add the IP addresses of the Proofpoint Protection Server
- Click Save
💡 Tip: Consider starting with a small subset of users to test Enhanced Filtering before rolling out organization-wide.
Step 4 — Bypass Safe Links URL Rewriting
Proofpoint URL Defense and Microsoft Safe Links cannot be used together. If you’re using Proofpoint URL Defense, disable Safe Links rewriting:
- In Exchange Admin Center, go to Mail flow → Rules
- Click + Add a rule
- Name:
Bypass Safelinks for Proofpoint - Apply this rule if: The sender → IP address in any of these ranges
- Add all Proofpoint IP addresses
- Do the following: Modify the message properties → set a message header
- Header:
X-MS-Exchange-Organization-SkipSafeLinksProcessing - Value:
1
- Header:
- Click Save
Preventing Direct Delivery Attacks
Why This Matters
The Problem: Attackers are finding ways to send malicious emails directly to Microsoft 365, completely bypassing Proofpoint. This allows phishing, malware, and BEC attacks to reach users without being scanned.
How It Works: Your MX records point to Proofpoint, so legitimate email flows through Proofpoint first. However, attackers can bypass this by sending directly to the M365 endpoint (e.g., contoso-com.mail.protection.outlook.com), skipping your security gateway entirely.
What You Need to Do:
- Audit domains to ensure MX records point to Proofpoint
- Confirm no users are using
onmicrosoft.comas their primary email - Block or quarantine direct delivery attempts
Direct Delivery Prevention Methods
| Method | Summary | Recommendation |
|---|---|---|
| 6A: Reject Connector | Connector rejects mail not from Proofpoint IPs | ✅ Recommended |
| 6B: Quarantine Rule | Transport rule quarantines direct delivery | Good alternative |
| 6C: Redirect to Proofpoint | Reroute direct delivery back through Proofpoint | ⚠️ Can cause SPF failures |
| 6D: Do Nothing | Rely on M365 native scanning | ❌ Not recommended |
Step 1 — Create Direct Delivery Audit Rule
Before blocking, audit what’s being delivered directly to identify legitimate sources.
- In Exchange Admin Center, go to Mail flow → Rules
- Click + Add a rule
- Name:
Audit Direct Delivery - Apply this rule if:
- The sender is located → Outside the organization
- AND The recipient is located → Inside the organization
- Do the following: Set message header
X-EOP-Direct-DeliverytoTrue - Except if:
- The sender → IP address in any of these ranges → Add Proofpoint IPs and authorized systems
- OR The message header
X-MS-Exchange-Generated-Message-SourceincludesMailbox Rules Agent - OR The message header
X-MS-Exchange-Organization-AuthAsmatchesInternal
- Click Save
Review the audit data using PowerShell:
$days = 3
$StartDate = (Get-Date).AddDays(-$days)
$EndDate = (Get-Date)

Get-MailDetailTransportRuleReport -PageSize 5000 -StartDate $StartDate -EndDate $EndDate -TransportRule "Audit Direct Delivery" | Export-Csv AuditDirectDelivery.csv
Method 6A — Exchange Online Reject Connector
Recommended approach. This connector rejects inbound mail from external senders unless it comes from Proofpoint IPs or is permitted by another connector.
- In Exchange Admin Center, go to Mail flow → Connectors
- Click + Add a connector
- Configure:
- Connection from: Partner organization
- Connection to: Microsoft 365
- Name:
Block Direct Delivery - Description:
Used to block direct delivered email from mail systems not on the exception list - ✅ Check Turn it on, then click Next
- Select: By verifying that the sender domain matches one of the following domains
- Add
*(wildcard) to match all domains - Click Next
- ✅ Reject email messages if they aren’t sent over TLS (optional)
- ✅ Reject email messages if they aren’t sent from within this IP address range
- Add all Proofpoint IPs and any other authorized systems not covered by existing connectors
- Click Next, verify, then Create connector
⚠️ Important: Rejections are NOT shown in M365 message tracing. Test thoroughly before enabling.
Method 6B — Quarantine Transport Rule
Alternative approach that quarantines (instead of rejects) direct delivery attempts, giving admins visibility to review.
- In Exchange Admin Center, go to Mail flow → Rules
- Click + Add a rule
- Name:
Block Direct Delivery - Apply this rule if:
- The sender is located → Outside the organization
- Do the following: Redirect the message to → the hosted quarantine
- Except if:
- The sender → IP address in any of these ranges → Add Proofpoint IPs
- OR The message header
X-MS-Exchange-Organization-AuthAsmatchesInternal
- ✅ Check Stop processing more rules
- Set Priority to
0(highest) - Click Save and enable the rule
💡 Tip: Quarantine is preferred over “Block the message” because blocking can cause backscatter (bounce messages to spoofed senders).
Configure Outbound Mail Flow
Step 1 — Create Outbound to Proofpoint Connector
- In Exchange Admin Center, go to Mail flow → Connectors
- Click + Add a connector
- Configure:
- Connection from: Microsoft 365
- Connection to: Partner organization
- Name:
Outbound to Proofpoint - Description:
Used to route outbound email through the Proofpoint Protection Server - ✅ Check Turn it on, then click Next
- Select: Only when I have a transport rule set up that redirects to the connector
- Select: Route email through these smart hosts
- Add the IP addresses or FQDNs of your Proofpoint Protection Server
- Click Next
- ✅ Always use Transport Layer Security (TLS)
- Select: Issued by a trusted certificate authority (CA)
- Click Next
- Add an external email address and click Validate to test TLS connectivity
- Verify settings and Create connector
Step 2 — Create Outbound Transport Rule (Testing)
Start with a limited scope to test:
- In Exchange Admin Center, go to Mail flow → Rules
- Click + Add a rule
- Name:
Outbound to Proofpoint Rule (Testing and IP Warmup) - Apply this rule if:
- The recipient → is external/internal → Outside the organization
- AND The sender → is the person → Select test users
- Do the following: Redirect the message to → the following connector →
Outbound to Proofpoint - Click Save
Step 3 — Expand Scope Gradually
Gradually add more senders to the transport rule until all outbound email flows through Proofpoint, then change the connector to use a wildcard (*) for all recipient domains.
⚠️ IP Warmup Required: New IP addresses need reputation building. Follow Proofpoint’s IP/Domain Reputation Warmup guide.
Configuring Phishing Simulations
If your organization uses Proofpoint’s Phishing Simulation tool for security awareness training, you need to configure Microsoft’s Advanced Delivery settings to prevent simulated phishing emails from being blocked by Microsoft Defender.
Why Advanced Delivery Matters
Without proper configuration, Microsoft Defender may block or quarantine your phishing simulation emails, preventing them from reaching users and defeating the purpose of the training. Advanced Delivery ensures that:
- Simulated phishing emails are delivered to user inboxes
- Teachable moments (the landing pages users see after clicking) aren’t blocked
- Your security team can track simulation results accurately
Configuration Steps
- Navigate to Microsoft 365 Defender → Advanced Delivery
- Click Add to create a new third-party phishing simulation configuration
- Configure the following settings:
Sending Domain
Add the domain found in the Sender Email Address field of your Proofpoint phishing template.
Example: If your template uses security@corp-internal.us, add corp-internal.us
Sending IP
You need to add both your organization’s mail relay IPs and Proofpoint’s Phishing Simulation server IPs.
Your Organization’s Mail Relay:
- If you have a security email gateway (like Proofpoint) in front of M365, add the IP(s) of your mail relay
- These can typically be found by looking at your organization’s MX record
Proofpoint Phishing Simulation IPs (by region):
| Region | IP Addresses |
|---|---|
| US | 107.23.16.22254.173.83.138 |
| EU | 52.17.45.9852.16.190.81 |
| AP | 13.55.65.813.55.54.143 |
Simulation URLs to Allow
While not required for links in email phishing simulations, adding the URLs embedded in your templates prevents Microsoft Defender from blocking the teachable moment landing pages.
Important: Use the format ~domain.com/* to ensure all subdomains and paths are covered.
Example URL patterns:
~corp-internal.us/*
~4ooi.com/*
~business-services.org/*
~account-maintenance.com/*
This format covers:
https://domain.com/uniqueIDhttps://www.domain.com/uniqueIDhttps://updates.domain.com/uniqueIDhttps://123.domain.com/uniqueID
Example Configuration
 Example showing sending domains, IPs (including Proofpoint US PhishSim IPs), and simulation URLs with wildcard formatting
Additional Considerations
- Press Enter after each entry when adding domains, IPs, or URLs
- If you’re running campaigns in multiple regions, add all relevant Proofpoint IPs
- Update the configuration whenever you add new phishing simulation domains
- Test your configuration by sending a test simulation before launching organization-wide campaigns
💡 Tip: For more details on Advanced Delivery, see Microsoft’s documentation: Configure the delivery of third-party phishing simulations
Troubleshooting & Common Issues
Monitoring for Direct Delivery
Problem: Attackers are sending emails directly to M365 (bypassing Proofpoint) by sending to yourcompany.mail.protection.outlook.com.
Detection Methods:
Method 1: Check Message Headers
Look for messages with compauth=fail in the headers—this indicates Microsoft flagged a message as suspicious but still delivered it:
Authentication-Results: spf=fail (sender IP is X.X.X.X)
 smtp.mailfrom=attacker.com; dkim=fail (body hash did not verify)
 header.d=attacker.com;dmarc=fail action=none
 header.from=attacker.com;compauth=fail reason=001
Method 2: Use Message Trace
- Log in to Exchange Admin Center
- Go to Mail flow → Message trace
- Filter by:
- Sender domain: External domains
- Look for: Messages where the sender IP is NOT your Proofpoint IP addresses
- Export results and identify unauthorized sources
Method 3: Check for X-EOP-Direct-Delivery Header
If you implemented the Audit Direct Delivery rule (from earlier in this guide), search for messages with the header X-EOP-Direct-Delivery: True.
PowerShell to find these messages:
$days = 7
$StartDate = (Get-Date).AddDays(-$days)
$EndDate = (Get-Date)

Get-MailDetailTransportRuleReport -PageSize 5000 -StartDate $StartDate -EndDate $EndDate -TransportRule "Audit Direct Delivery" |
    Export-Csv C:\AuditDirectDelivery.csv -NoTypeInformation
Authentication Failures (DMARC/SPF/DKIM)
Problem: Legitimate emails are being rejected or marked as spam due to DMARC, SPF, or DKIM failures.
Root Cause: When both Proofpoint and M365 perform email authentication checks, conflicts can occur.
Solution 1: Disable Authentication Checks in M365
DMARC, DKIM, and SPF should be checked only at the Proofpoint gateway. Disable them in M365:
-
Disable DMARC/SPF in Anti-Spam Policy:
- Go to Microsoft 365 Defender → Policies & Rules → Threat policies → Anti-spam
- Edit your policy
- Under Actions, disable SPF record checking and DMARC failure actions
-
Verify Connection Filter Allows Proofpoint:
- Ensure Proofpoint IPs are in the Connection Filter IP Allow List (covered earlier in this guide)
Solution 2: Redirect Back to Proofpoint Can Cause Issues
If you’re using Method 6C (Redirect back to Proofpoint), be aware that:
- The sender IP changes to M365’s IP when rerouted through Proofpoint
- If the sender’s domain has strict SPF (
-all) or DMARC reject, authentication WILL fail - Spoofed emails might pass if the spoofed domain includes Microsoft in its SPF record
Recommended: Use Method 6A (Reject Connector) or Method 6B (Quarantine) instead.
Legitimate Emails Blocked by Proofpoint
Problem: Proofpoint is incorrectly flagging legitimate emails as spam.
Solution:
-
Submit False Positive Reports:
- Log in to Proofpoint
- Navigate to System → Smart Search
- Find the blocked message
- Click Report as False Positive to Proofpoint support
-
Create Allow List Entry:
- If a specific sender is repeatedly blocked, add them to your allow list in Proofpoint
- Navigate to Email Protection → End User Safelist
-
Review Spam Threshold:
- Check your spam policy score thresholds aren’t too aggressive
- Adjust the score required to trigger quarantine vs. delivery
Mail Flow Disruptions (DNS Issues)
Problem: Intermittent mail delivery failures with “Host Unknown” errors.
Root Cause: DNS incompatibilities between Proofpoint and Microsoft (related to EDNS, DNS over TCP, or BIND updates).
Solution:
-
Check Proofpoint Service Status:
- Visit Proofpoint’s status page for known issues
-
Verify DNS Records:
- Ensure your MX records point correctly to Proofpoint
- TTL should be reasonable (3600 seconds is standard)
-
Contact Proofpoint Support:
- They may have applied workarounds (e.g., disabling EDNS queries for Microsoft servers)
Security Features Compatibility Matrix
| Microsoft Feature | Proofpoint Feature | Use Together? |
|---|---|---|
| EOP Anti-Spam | PPS Spam Filtering | ⚠️ Bypass EOP for Proofpoint IPs |
| EOP Anti-Malware | PPS Anti-Malware | ✅ Yes |
| EOP Anti-Phishing | PPS Anti-Phishing | ✅ Yes |
| MSDO Safe Links (Email) | TAP URL Defense | ❌ No — Disable Safe Links rewriting |
| MSDO Safe Links (SharePoint, Teams) | TAP URL Defense | ✅ Yes |
| MSDO Safe Attachments (Email) | TAP Attachment Defense | ✅ Yes (adds delay) |
| MSDO Safe Attachments (Non-email) | TAP SaaS Defense | ✅ Yes |
| Zero-hour Auto Purge (ZAP) | Threat Response Auto Pull (TRAP) | ❌ No — Disable ZAP |
| Data Loss Prevention | Regulatory Compliance | ❌ No — Use one solution |
| Office Message Encryption | Proofpoint Encryption | ❌ No — Use one solution |
Disabling ZAP (if using TRAP)
# View current ZAP settings
Get-HostedContentFilterPolicy | Select-Object Name, SpamAction, ZapEnabled, PhishZapEnabled, SpamZapEnabled, IsDefault

# Disable ZAP
Set-HostedContentFilterPolicy -Identity "Default" -ZapEnabled $false -SpamZapEnabled $false -PhishZapEnabled $false
Resources
Microsoft Documentation
- Anti-malware protection in EOP
- Anti-spoofing protection in EOP
- Configure connection filtering
- Enhanced Filtering for Connectors
- Safe Links in Microsoft Defender
- Zero-hour auto purge (ZAP)