Learn the fundamentals of Terraform by running it locally with Azure CLI authentication.
| Info | Details |
|---|---|
| Series | ClickOps to Terraform |
| Part | 1 of 5 |
| Difficulty | Beginner to Intermediate |
| Estimated Time | 1 Hour |
Welcome to the ClickOps to Terraform Series
If you’ve been managing Azure resources through the portal—clicking, configuring, and hoping you remember what you did last time—you’re not alone. Most of us started that way. But as your infrastructure grows, so does the pain of “ClickOps.”
This 5-part series is your guide to transitioning from manual portal work to automated, repeatable, and version-controlled infrastructure with Terraform. By the end, you’ll confidently write Terraform code, automate deployments through Azure DevOps, and even bring your existing Azure resources under Terraform management.
Series Roadmap
| Part | Title | What You’ll Learn |
|---|---|---|
| 1 | Terraform with Azure CLI (You are here) | Local development, HCL basics, the Terraform workflow |
| 2 | Setting Up Azure DevOps & Terraform | Service principals, remote state, your first pipeline |
| 3 | Getting Comfortable with Terraform | Variables, outputs, remote state, building confidence |
| 4 | Importing Existing Resources | Using terraform import to bring in existing Azure resources |
| 5 | Adopting Terraform as an Organization | Team workflows, standards, moving away from ClickOps for good |
Each part builds on the previous, but they’re designed to be practical enough to reference individually when you need them.
📅 Release Schedule: Part 1 is available now. New parts will be released weekly—check back soon for Part 2!
Why Learn Terraform? (Even If It Seems Intimidating)
Terraform and Infrastructure as Code might feel overwhelming if you’re used to the Azure Portal. The syntax looks foreign, state files seem scary, and pipelines add complexity. That’s completely normal.
But here’s the truth: Terraform is worth the learning curve. Here’s why:
| ClickOps Reality | Terraform Reality |
|---|---|
| “How did we configure that NSG rule in prod?” | git log network.tf — full history |
| Recreating dev environment takes 4+ hours of clicking | terraform apply -var="env=dev" — 15 minutes |
| New team member spends 3 days setting up their environment | git clone && terraform apply — 10 minutes |
| Someone accidentally deletes a resource | Terraform detects drift and can recreate it |
| Auditor asks for proof of compliance | Show them the code — every setting is documented |
The investment: ~15 hours to learn the fundamentals.
The payoff: You’ll save that time back after recreating environments just a few times.
If you’re comfortable with Azure CLI or PowerShell, you can learn Terraform. The syntax is simple, the workflow is predictable, and once it clicks, you’ll wonder why you ever did it the old way.
Overview
In this first part, we’ll run Terraform directly on your local machine. No pipelines, no service principals, no complexity—just you, your terminal, and Azure. This is the best way to learn because you can see exactly what’s happening at each step.
By the end of this guide, you’ll have deployed real Azure resources using Terraform and understand the core workflow that everything else builds upon.
What You’ll Learn
- Installing and configuring Terraform
- The Terraform workflow:
init,plan,apply,destroy - How Terraform authentication works locally
- Understanding HCL (HashiCorp Configuration Language) syntax
- Professional file structure and organization
- Best practices for local development
Prerequisites
- Azure Subscription with Contributor access
- Azure CLI installed (Download here)
- Code Editor (VS Code recommended)
- Terminal/Command Line access
1. Installing Terraform
Let’s get Terraform installed on your machine. Choose your operating system below:
Windows (Chocolatey - Recommended)
# Run in Administrator PowerShell
choco install terraform -y
macOS (Homebrew)
brew tap hashicorp/tap
brew install hashicorp/tap/terraform
Linux (Ubuntu/Debian)
wget -O- https://apt.releases.hashicorp.com/gpg | sudo gpg --dearmor -o /usr/share/keyrings/hashicorp-archive-keyring.gpg
echo "deb [signed-by=/usr/share/keyrings/hashicorp-archive-keyring.gpg] https://apt.releases.hashicorp.com $(lsb_release -cs) main" | sudo tee /etc/apt/sources.list.d/hashicorp.list
sudo apt update && sudo apt install terraform
Verify Installation
terraform version
Expected Output:
Terraform v1.6.x
on darwin_arm64
Install VS Code Extension
- Open VS Code
- Go to Extensions (Cmd/Ctrl + Shift + X)
- Search for “HashiCorp Terraform”
- Install the official extension
2. The Terraform Workflow
Before writing any code, let’s understand the core commands you’ll use every time. Terraform follows a predictable workflow:
┌─────────────┐     ┌─────────────┐     ┌─────────────┐     ┌─────────────┐
│             │     │             │     │             │     │             │
│    init     │ ──▶ │    plan     │ ──▶ │    apply    │ ──▶ │   destroy   │
│             │     │             │     │             │     │             │
│ Download    │     │ Preview     │     │ Execute     │     │ Tear down   │
│ providers   │     │ changes     │     │ changes     │     │ resources   │
└─────────────┘     └─────────────┘     └─────────────┘     └─────────────┘
| Command | What It Does | When to Use |
|---|---|---|
terraform init |
Downloads provider plugins, initializes backend | First time setup, or after adding providers |
terraform plan |
Shows what Terraform will do without doing it | Always run before apply |
terraform apply |
Creates/updates resources in Azure | When you’re ready to deploy |
terraform destroy |
Deletes all resources managed by this config | Cleanup or tear down |
The golden rule: Always run plan before apply. Never apply blind.
3. Understanding Terraform Authentication
Now that you know the workflow, let’s understand who Terraform acts as when it talks to Azure.
When running locally, Terraform uses your existing Azure CLI credentials.
Local Authentication Flow
When you run terraform apply on your laptop:
- Terraform looks for Azure credentials in your environment
- It finds the authentication token from
az login - Result: Terraform acts as YOU
┌──────────────┐         ┌──────────────┐         ┌──────────────┐
│              │         │              │         │              │
│  You run     │  ────▶  │  Terraform   │  ────▶  │  Azure API   │
│  terraform   │         │  uses your   │         │  creates     │
│  apply       │         │  az login    │         │  resources   │
│              │         │  token       │         │              │
└──────────────┘         └──────────────┘         └──────────────┘
Key Point: If you have permission to create a Resource Group, Terraform has permission. If you don’t, Terraform doesn’t.
💡 In Part 2, we’ll cover how authentication works differently in CI/CD pipelines using service principals.
4. Understanding HCL Syntax
Terraform uses HCL (HashiCorp Configuration Language). It might look intimidating, but it follows a simple pattern:
The Basic Pattern
BLOCK_TYPE "PROVIDER_TYPE" "INTERNAL_NAME" {
  argument = value
  argument = value
}
Real Example
# BLOCK TYPE  "PROVIDER TYPE"           "INTERNAL NAME"
resource      "azurerm_resource_group"  "demo" {

  # ARGUMENTS
  name     = "rg-local-demo-001"
  location = "East US"
}
Breaking it down:
- Block Type (
resource): Tells Terraform “I want to CREATE something” - Provider Type (
azurerm_resource_group): The specific Azure resource type - Internal Name (
demo): A nickname for this resource in your code (Azure never sees this) - Arguments: Configuration values (name, location, etc.)
Referencing Resources
You can reference other resources using the pattern: BLOCK_TYPE.INTERNAL_NAME.ATTRIBUTE
# Create a resource group
resource "azurerm_resource_group" "demo" {
  name     = "rg-demo-001"
  location = "East US"
}

# Create a VNet in that resource group
resource "azurerm_virtual_network" "demo_vnet" {
  name                = "vnet-demo-001"
  location            = azurerm_resource_group.demo.location  # Reference!
  resource_group_name = azurerm_resource_group.demo.name      # Reference!
  address_space       = ["10.0.0.0/16"]
}
5. Your First Terraform Deployment
Step 1: Create a Project Folder
mkdir ~/terraform-learning
cd ~/terraform-learning
Step 2: Authenticate to Azure
az login
az account set --subscription "YOUR-SUBSCRIPTION-NAME"
Step 3: Create main.tf
Create a file named main.tf with this content:
# Configure Terraform to use the Azure provider
terraform {
  required_providers {
    azurerm = {
      source  = "hashicorp/azurerm"
      version = "~> 3.0"
    }
  }
}

# Configure the Azure provider
provider "azurerm" {
  features {}
}

# Create a resource group
resource "azurerm_resource_group" "demo_local" {
  name     = "rg-terraform-local-demo"
  location = "East US"
}
Step 4: Run the Terraform Workflow
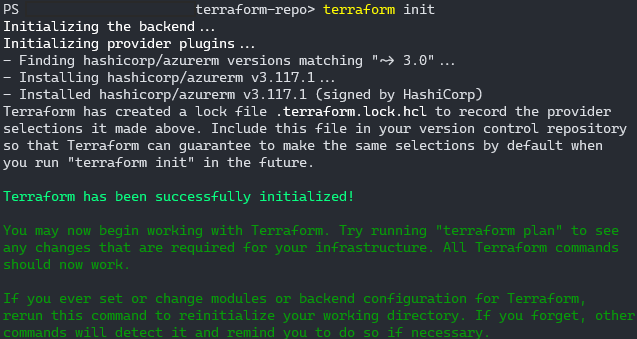
Initialize (Download Provider Plugins)
terraform init
What happens:
- Terraform reads your
terraform {}block - Downloads the Azure provider plugin
- Creates a
.terraformfolder (don’t commit this to Git!)
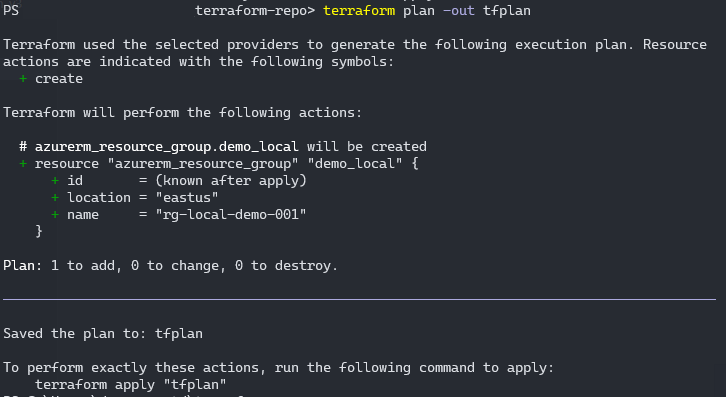
Plan (Preview Changes)
terraform plan
What happens:
- Terraform compares your code to what exists in Azure
- Shows you what it will create, update, or destroy
- No changes are made yet!
Expected Output:
Terraform will perform the following actions:

  # azurerm_resource_group.demo_local will be created
  + resource "azurerm_resource_group" "demo_local" {
      + id       = (known after apply)
      + location = "eastus"
      + name     = "rg-terraform-local-demo"
    }

Plan: 1 to add, 0 to change, 0 to destroy.
Apply (Execute Changes)
terraform apply
What happens:
- Shows you the plan again
- Asks for confirmation (type
yes) - Creates the resources in Azure
- Saves the state to
terraform.tfstate
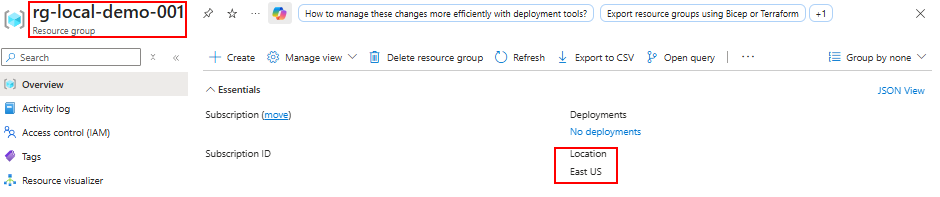
🎉 Success! Check the Azure Portal - you should see your new resource group!

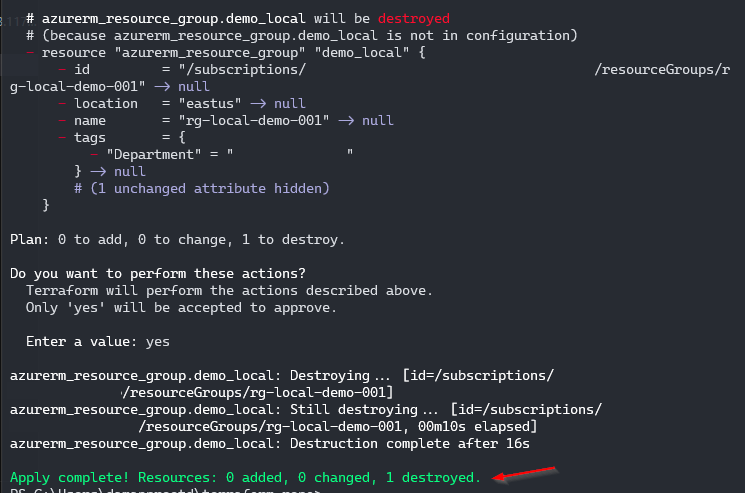
Destroy (Clean Up)
terraform destroy
What happens:
- Shows what will be deleted
- Asks for confirmation (type
yes) - Removes all resources managed by this Terraform code
6. Professional File Structure
Running everything in a single main.tf works for learning, but in production, we split our code into multiple files for better organization.
Important: Terraform loads ALL .tf files in a folder together. Splitting files is purely for human readability.
The Standard Pattern
terraform-project/
├── providers.tf      # Terraform and provider configuration
├── variables.tf      # Input variables
├── main.tf          # Resource definitions
├── outputs.tf       # Output values
└── .gitignore       # Ignore terraform state files
Example: Multi-File Structure
providers.tf
terraform {
  required_version = ">= 1.0"

  required_providers {
    azurerm = {
      source  = "hashicorp/azurerm"
      version = "~> 3.0"
    }
  }
}

provider "azurerm" {
  features {}
}
variables.tf
variable "location" {
  description = "Azure region for resources"
  type        = string
  default     = "East US"
}

variable "environment" {
  description = "Environment name (dev, staging, prod)"
  type        = string
  default     = "dev"
}

variable "project_name" {
  description = "Project name for resource naming"
  type        = string
  default     = "demo"
}
main.tf
# Resource Group
resource "azurerm_resource_group" "main" {
  name     = "rg-${var.project_name}-${var.environment}"
  location = var.location

  tags = {
    Environment = var.environment
    ManagedBy   = "Terraform"
  }
}

# Virtual Network
resource "azurerm_virtual_network" "main" {
  name                = "vnet-${var.project_name}-${var.environment}"
  location            = azurerm_resource_group.main.location
  resource_group_name = azurerm_resource_group.main.name
  address_space       = ["10.0.0.0/16"]

  tags = {
    Environment = var.environment
    ManagedBy   = "Terraform"
  }
}
outputs.tf
output "resource_group_name" {
  description = "Name of the created resource group"
  value       = azurerm_resource_group.main.name
}

output "vnet_id" {
  description = "ID of the created virtual network"
  value       = azurerm_virtual_network.main.id
}
.gitignore
# Terraform files
.terraform/
*.tfstate
*.tfstate.*
.terraform.lock.hcl

# Crash logs
crash.log

# Variable files (may contain secrets)
*.tfvars
*.tfvars.json
Using Variables
You can override default values in multiple ways:
1. Command Line:
terraform apply -var="environment=prod" -var="location=West US"
2. Variable File (terraform.tfvars):
environment  = "prod"
location     = "West US"
project_name = "myapp"
Then run:
terraform apply
3. Environment Variables:
export TF_VAR_environment="prod"
terraform apply
7. The Terraform State File
After running terraform apply, you’ll notice a new file: terraform.tfstate
What is State?
The state file is Terraform’s memory. It contains:
- What resources Terraform created
- Their current configuration
- Resource IDs and attributes
- Dependencies between resources
Why is it Important?
Without state, Terraform can’t:
- Know what it previously created
- Detect changes (drift)
- Plan updates correctly
- Destroy resources
State Best Practices
❌ DON’T:
- Commit
terraform.tfstateto Git (contains secrets!) - Manually edit the state file
- Share state files via email or Slack
✅ DO:
- Add
*.tfstate*to.gitignore - Use remote state for team collaboration (covered in Part 2)
- Back up your state file
- Use state locking to prevent conflicts
8. Common Commands Reference
| Command | Purpose | When to Use |
|---|---|---|
terraform init |
Initialize working directory | First time, or after adding new providers |
terraform validate |
Check syntax | Before committing code |
terraform fmt |
Format code | Before committing code |
terraform plan |
Preview changes | Before applying |
terraform apply |
Create/update resources | When ready to deploy |
terraform destroy |
Delete all resources | Cleanup or tear down |
terraform show |
View current state | Inspect what’s deployed |
terraform output |
Display output values | Get resource information |
9. Hands-On Exercise
Challenge: Deploy a Complete Environment
Create a Terraform configuration that deploys:
- A resource group
- A virtual network with address space
10.0.0.0/16 - Two subnets:
subnet-web(10.0.1.0/24)subnet-data(10.0.2.0/24)
- A network security group
- Proper tags on all resources
Requirements:
- Use variables for location and environment
- Use proper file structure (providers.tf, variables.tf, main.tf, outputs.tf)
- Output the resource group name and VNet ID
Click to see solution
providers.tf:
terraform {
  required_providers {
    azurerm = {
      source  = "hashicorp/azurerm"
      version = "~> 3.0"
    }
  }
}

provider "azurerm" {
  features {}
}
variables.tf:
variable "location" {
  type    = string
  default = "East US"
}

variable "environment" {
  type    = string
  default = "dev"
}
main.tf:
resource "azurerm_resource_group" "main" {
  name     = "rg-exercise-${var.environment}"
  location = var.location

  tags = {
    Environment = var.environment
    ManagedBy   = "Terraform"
  }
}

resource "azurerm_virtual_network" "main" {
  name                = "vnet-exercise-${var.environment}"
  location            = azurerm_resource_group.main.location
  resource_group_name = azurerm_resource_group.main.name
  address_space       = ["10.0.0.0/16"]

  tags = {
    Environment = var.environment
    ManagedBy   = "Terraform"
  }
}

resource "azurerm_subnet" "web" {
  name                 = "subnet-web"
  resource_group_name  = azurerm_resource_group.main.name
  virtual_network_name = azurerm_virtual_network.main.name
  address_prefixes     = ["10.0.1.0/24"]
}

resource "azurerm_subnet" "data" {
  name                 = "subnet-data"
  resource_group_name  = azurerm_resource_group.main.name
  virtual_network_name = azurerm_virtual_network.main.name
  address_prefixes     = ["10.0.2.0/24"]
}

resource "azurerm_network_security_group" "main" {
  name                = "nsg-exercise-${var.environment}"
  location            = azurerm_resource_group.main.location
  resource_group_name = azurerm_resource_group.main.name

  tags = {
    Environment = var.environment
    ManagedBy   = "Terraform"
  }
}
outputs.tf:
output "resource_group_name" {
  value = azurerm_resource_group.main.name
}

output "vnet_id" {
  value = azurerm_virtual_network.main.id
}
Key Takeaways
✅ Terraform uses your local Azure CLI credentials when running locally
✅ HCL syntax follows a simple block_type "provider_type" "name" {} pattern
✅ The workflow is always: init → plan → apply
✅ Professional projects use multiple .tf files for organization
✅ The state file is Terraform’s memory - never commit it to Git
✅ Variables make your code reusable and environment-agnostic
Next Steps
Now that you understand how Terraform works locally, you’re ready to move to team collaboration and automation!
Continue to Part 2: Setting Up Azure DevOps and Terraform → (Coming Soon)